Технический бюллютень
компании Крайслер
Номер: 18-57-89
Дата: 29 декабря 1989
Двигатель 4 литра не заводится, заводится
трудно или периодически глохнет
4.0L engine no-start, hard restart, or an engine
die-out
Модели:
 (MJ)
Comanche 1989 (MJ)
Comanche 1989
 (XJ) Cherokee
1989 (XJ) Cherokee
1989
SYMPTOM/CONDITION
Some 19B9 vehicles equipped with the 4.0L engine and automatic transmission may experience an engine no-start, hard restart, or an engine die-out. This condition may be caused by low signal strength from the crank position sensor due to a larger than desired distance to the flywheel sensing ring.
DIAGNOSIS
 
Check to see if the vehicle has a slotted crank position sensor:
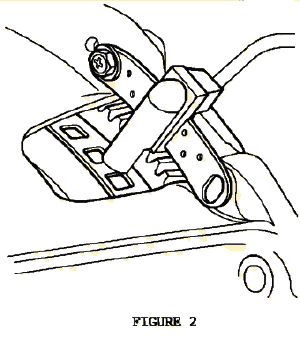
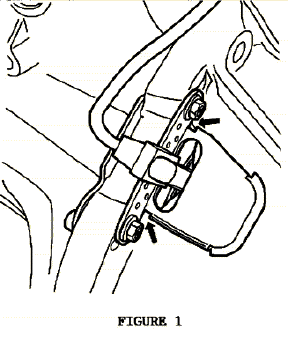
1. If the vehicle is equipped with a slotted crank position sensor (see Figure 1), check to see if the CPS grommet on the top of the transmission bell housing has been updated (see Figure 2). If the CPS grommet has not been updated, replace the CPS grommet per the Repair Procedure outlined below.
If the vehicle has a slotted crank position sensor and new CPS grommet, do not install a new
sensor, but reinstall the slotted sensor that was on the vehicle and verify that it is good using
procedures in the 19B9 Jeep Seivice Manual B1-370-9045 on page 14-B7.
2. If the vehicle does not have a slotted crank position sensor already installed, then proceed with the Repair Procedure.
PARTS REQUIRED
1 Crank Position Sensor (slotted) PNB3100067 1 Crank Position Sensor Grommet (dust cover) PNB310006B
REPAIR PROCEDURE
1. Turn the ignition switch to the "OFF" position.
2. Disconnect the Crank Position Sensor (CPS) from the engine harness.
3. Raise the vehicle using a lift.
4. Remove the old CPS and grommet.
5. Install the new CPS grommet.
NOTE: THE NEW CPS GROMMET MUST BE REPLACED SO THAT THE MAXIMUM SIGNAL OUTPUT CAN BE OBTAINED FROM THE NEW CRANK POSITION SENSOR. 6. Install the new Crank Position Sensor and loosely attach the retaining bolts. 7. Firmly press down on the slotted hole side of the CPS until it bottoms on the machined lip of the bellhousing. While holding the CPS down against the bellhousing, tighten the bolt on the slotted side of the CPS to I6 ft.lbs.
8. Tighten the remaining attaching bolt to 16 ft.lbs.
NOTE: MAKE CERTAIN THAT THE CRANK POSITION SENSOR IS COMPLETELY
BOTTOMED ON THE MACHINED LIP OF THE BELLHOUSING AND IS AS CLOSE AS
POSSIBLE TO THE FLYWHEEL SENSING RING WITHOUT CONTACTING IT.
9. Secure the lead of the CPS to the retaining clip on the
bellhousing to prevent its contact with the exhaust manifold.
10. Lowerthe vehicle.
11. Connect the CPS to the engine harness.
POLICY: Reimbursable within the provisions of the warranty.
TIME ALLOWANCE:
Labor Operation No. OB-15-79-90 ................ 0.3 Hrs.
FAILURE CODE: OX - Wrong Part
|

